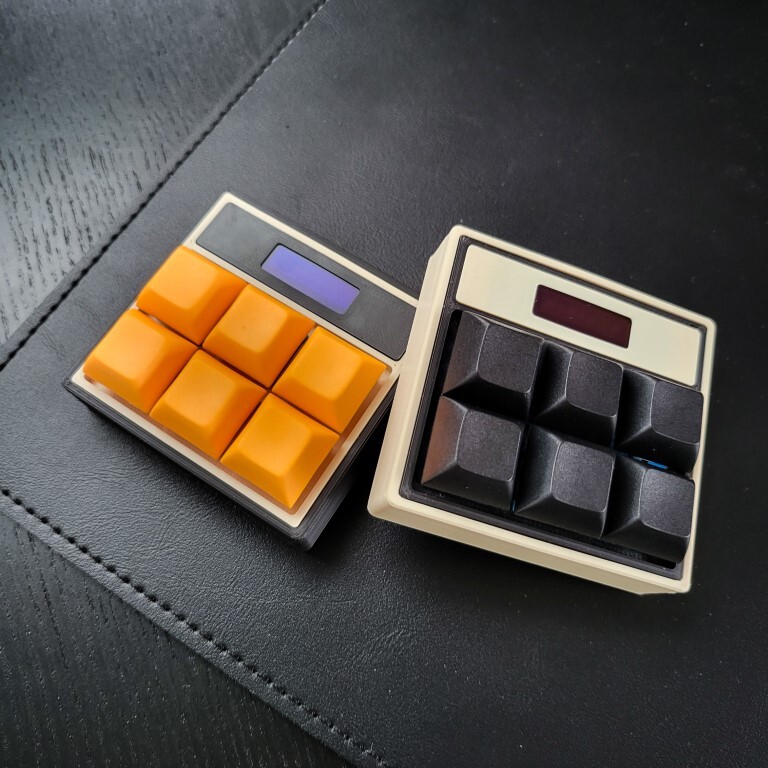
Pikku - Raspberry Pi Pico Powered Macropad
Small customizable six key macropad powered by Raspberry Pi Pico microcontroller.

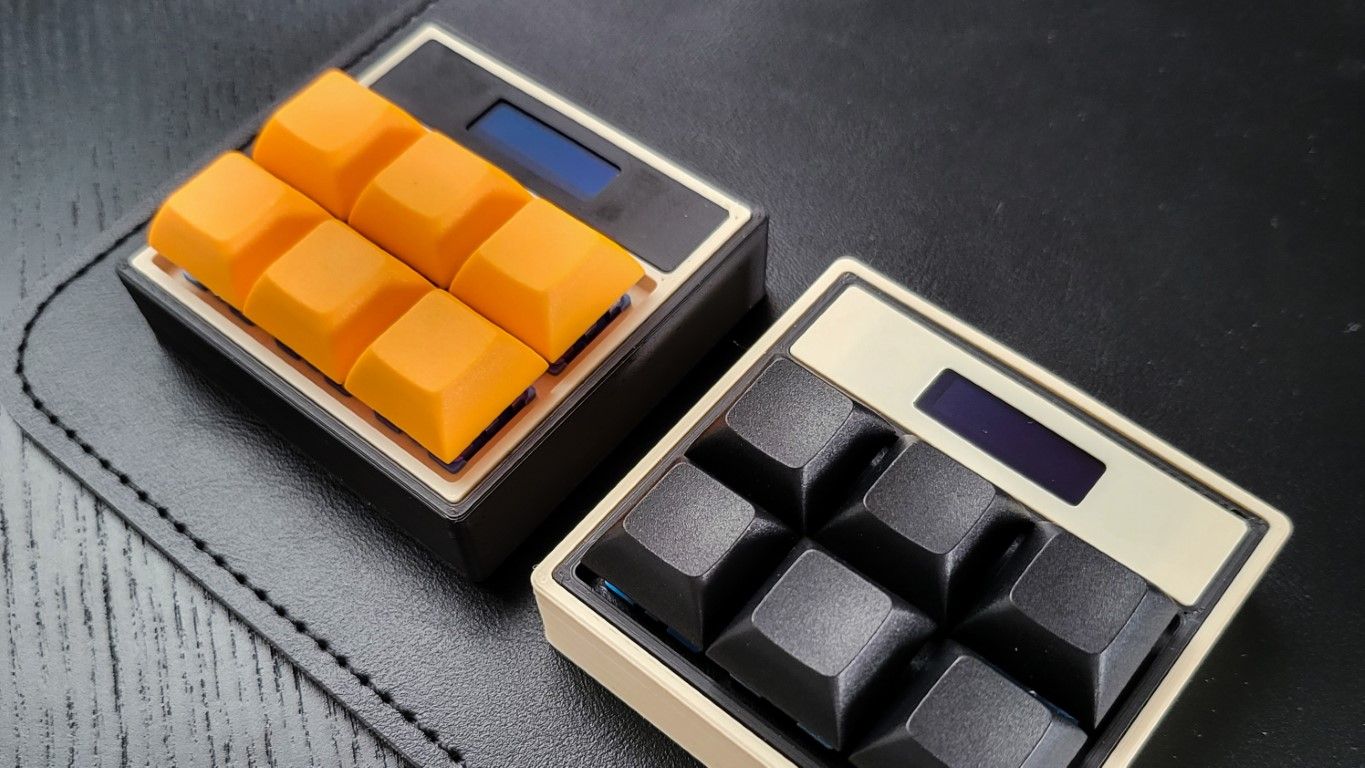
I designed and built a small Raspberry Pi Pico powered macropad. Code is written with Python and it is easy to customize with your own macros. You can start with current code as a basis and add your own macros there. I added functionality so that the first key changes the mode - current modes include VS Code, MS Teams, Git and more could be easily added.
TL;DR: Check the GitHub repository for code: github.com/tlaukkanen/pikku-macropad. 3D printable .stl models are also available via Printables.com
Bill of Material
Components needed to build your own macropad:
- Raspberry Pi Pico
- MX key switches and keycaps (6 pcs), I used these from Pi Hut
- Display Module SSD1306 I2C 128x32 LCD OLED Screen
- 3D printed case
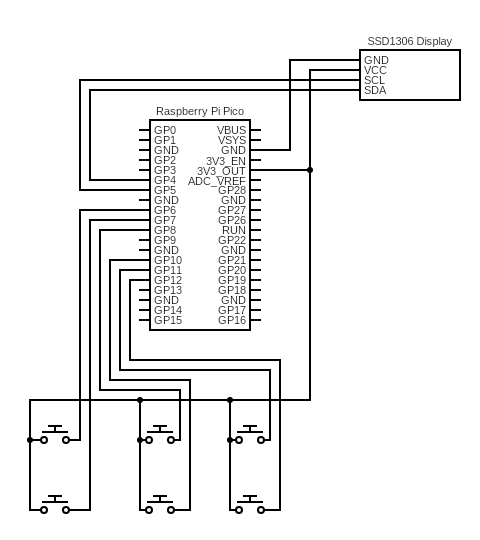
Schematics
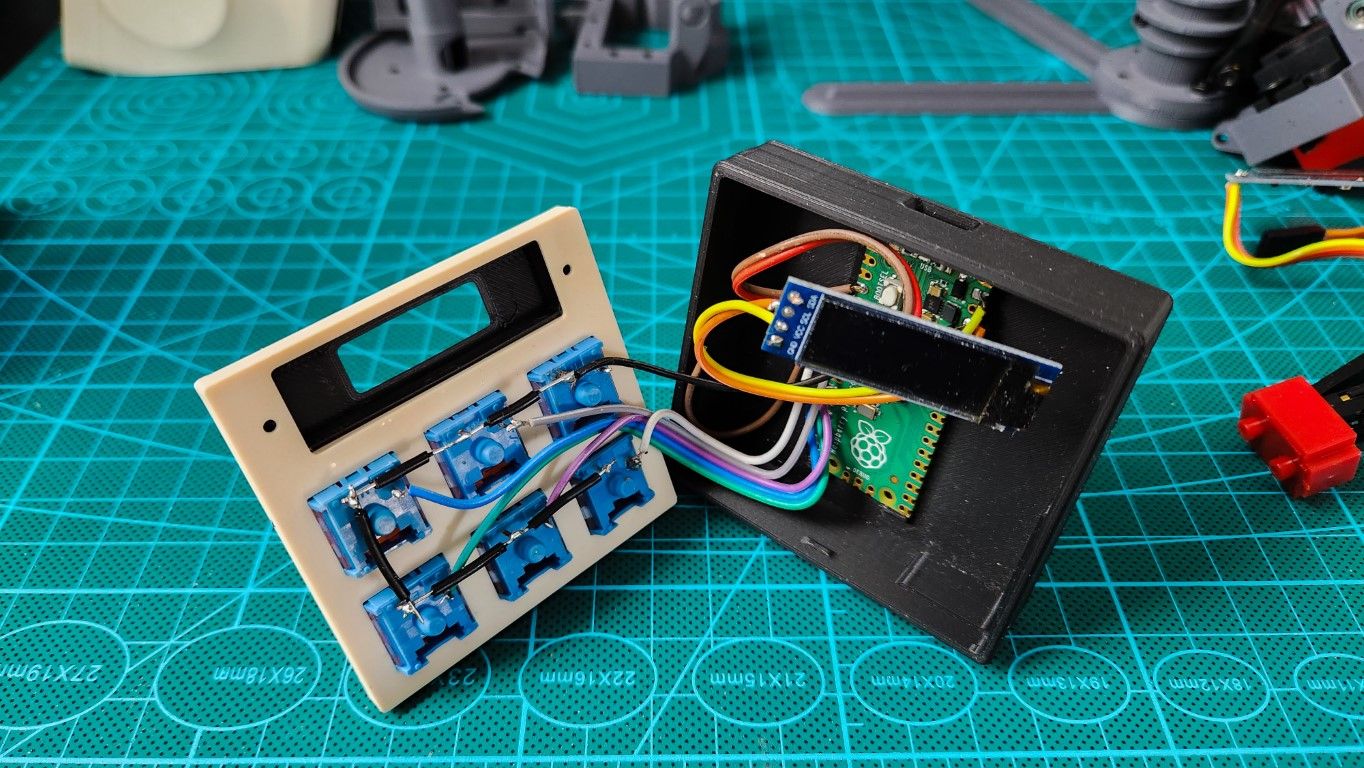
The wiring is quite simple: SSD1306 is connected via I2C pins (GP4=SDA and GP5=SCL) and buttons are connected to 3.3V voltage and other pins from switch is connected to individual GP6,7,8,10,11,12 pins.
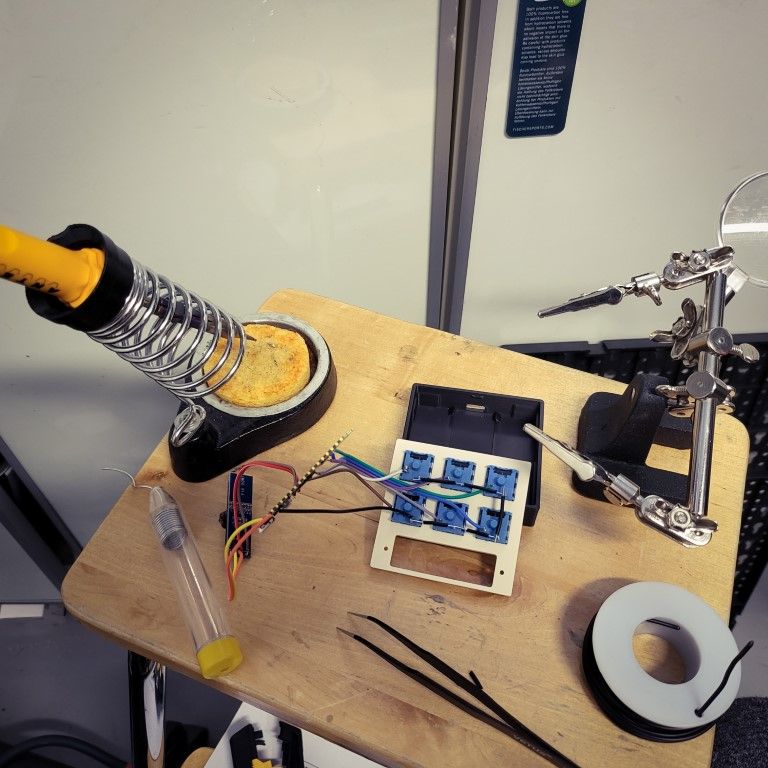
Hardware - 3D Printed Case and Soldering
I designed the case to be simple and easy to print. It consists of three layers where the base houses the Raspberry Pico, the middle piece holds the key switches in place and the small top part fits the display inside.
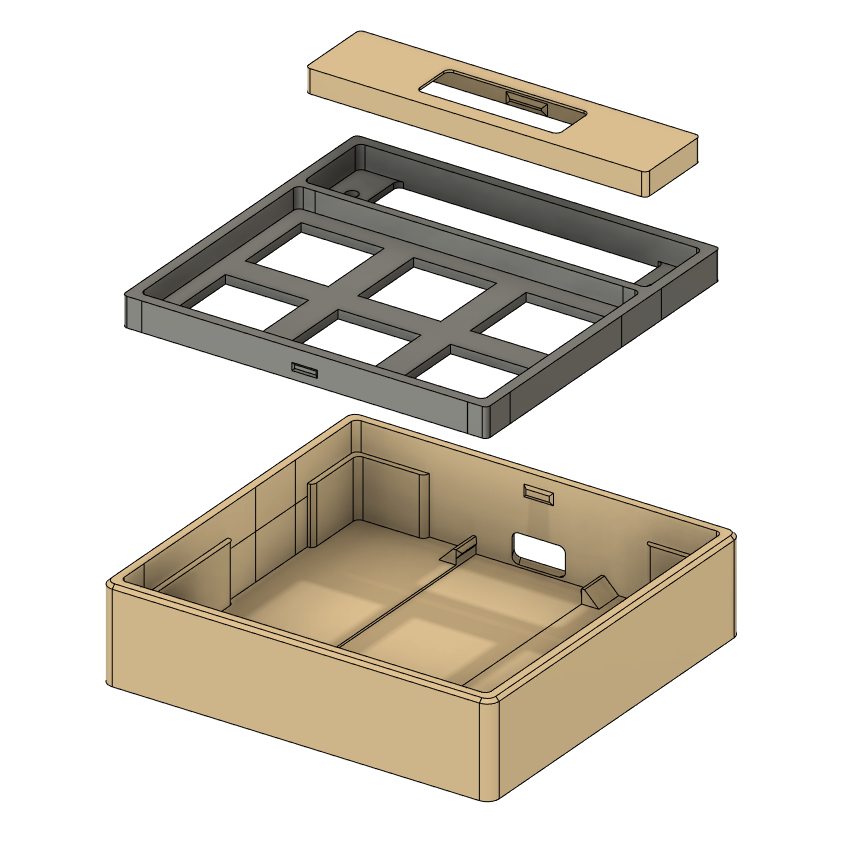
You can print parts with assorted colors to have different looks.

Soldering should be done when key switches are in place as the wiring wouldn't allow you to fit switches into the middle layer part afterwards.
Code
I flashed the Raspberry Pi Pico with the latest CircuitPython firmware by following this "Getting started with CircuitPython" tutorial from Adafruit. For code I used CircuitPython libraries:
- adafruit-circuitpython-hid for keyboard communication
- adafruit-circuitpython-ssd1306 for controlling display
- Downloaded font5x8.bin file from adafruit-circuitpython-framebuf and uploaded to root of Pico. This is used by SSD1306 module for displaying text with
ssd1306_display.text("some text", x, y)
Here's the full code for the macropad. Code can also be found from GitHub, here.
import board
import busio
import time
import usb_hid
import digitalio
import adafruit_ssd1306
from adafruit_hid.keycode import Keycode
from adafruit_hid.keyboard import Keyboard
from adafruit_hid.keyboard_layout_us import KeyboardLayoutUS

# Button mapping
BTN1_PIN = board.GP6
BTN2_PIN = board.GP8
BTN3_PIN = board.GP11
BTN4_PIN = board.GP7
BTN5_PIN = board.GP10
BTN6_PIN = board.GP12

buttons = [
    digitalio.DigitalInOut(BTN1_PIN),
    digitalio.DigitalInOut(BTN2_PIN),
    digitalio.DigitalInOut(BTN3_PIN),
    digitalio.DigitalInOut(BTN4_PIN),
    digitalio.DigitalInOut(BTN5_PIN),
    digitalio.DigitalInOut(BTN6_PIN)
]
for i in range(0,6):
    buttons[i].direction = digitalio.Direction.INPUT
    buttons[i].pull = digitalio.Pull.DOWN

# OLED display setup
WIDTH = 128
HEIGHT = 32

# I2C pins
SCL = 5
SDA = 4

BTN_DOWN = 1
BTN_UP = 0

lastState = BTN_UP
modes = [
    ['Teams',           # Mode name
     'Search',          # Key 2 function
     'Goto',            # Key 3 function
     'Toggle mute',     # Key 4 function
     'Toggle camera',   # Key 5 function
     'Hangup'           # Key 6 function
    ],
    ['VS Code',         # Mode name
     'Explorer',        # Key 2 function
     'Problems',        # Key 3 function
     'Search',          # Key 4 function
     'Debug',           # Key 5 function
     'Output'           # Key 6 function
    ],
    ['Git',             # Mode name
     'Branch..',        # Key 2 function
     'Checkout main',   # Key 3 function
     'Status',          # Key 4 function
     'Push',            # Key 5 function
     'Pull org main'    # Key 6 function
    ]

]

keyboard = Keyboard(usb_hid.devices)
layout = KeyboardLayoutUS(keyboard)
MODE_TEAMS = 0
MODE_VSCODE = 1
MODE_GIT = 2
COUNT_OF_MODES = 3
currentMode = MODE_GIT

# Initialize I2C
i2c = busio.I2C(scl=board.GP5, sda=board.GP4)
display = adafruit_ssd1306.SSD1306_I2C(WIDTH, HEIGHT, i2c)

def handle_mode_press(mode, key):
    if(mode == MODE_TEAMS):
        if key == 1:
            keyboard.send(Keycode.LEFT_CONTROL, Keycode.E)
        if key == 2:
            keyboard.send(Keycode.LEFT_CONTROL, Keycode.G)
        if key == 3:
            keyboard.send(Keycode.LEFT_CONTROL, Keycode.SHIFT, Keycode.M)
        if key == 4:
            keyboard.send(Keycode.LEFT_CONTROL, Keycode.SHIFT, Keycode.O)
        if key == 5:
            keyboard.send(Keycode.LEFT_CONTROL, Keycode.SHIFT, Keycode.B)
    if(mode == MODE_VSCODE):
        if key == 1:
            keyboard.send(Keycode.LEFT_CONTROL, Keycode.SHIFT, Keycode.E)
        if key == 2:
            keyboard.send(Keycode.LEFT_CONTROL, Keycode.SHIFT, Keycode.M)
        if key == 3:
            keyboard.send(Keycode.LEFT_CONTROL, Keycode.SHIFT, Keycode.F)
        if key == 4:
            keyboard.send(Keycode.F5)
        if key == 5:
            keyboard.send(Keycode.LEFT_CONTROL, Keycode.SHIFT, Keycode.U)
    if(mode == MODE_GIT):
        if key == 1:
            layout.write('git branch -b ')
        if key == 2:
            layout.write('git checkout main\n')
        if key == 3:
            layout.write('git status\n')
        if key == 4:
            layout.write('git push\n')
        if key == 5:
            layout.write('git pull origin main\n')

def draw_screen(text, x, y):
    global currentMode
    global modes
    display.fill(0)
    display.text(text, x, y, 1)
    display.text("Mode: " + modes[currentMode][0], 24, 12, 1)
    display.text("Pikku v1.0", 24, 24, 1)
    display.show()

def buttonPress(last):
    global currentMode
    tempLast = last
    text = ""
    nextState = last

    # Check key 1 mode change
    if (tempLast == BTN_UP) and (buttons[0].value):
        nextState = BTN_DOWN
        currentMode += 1
        if(currentMode>COUNT_OF_MODES-1):
            currentMode = 0
        draw_screen("", 1, 1)

    # Check keys 2-6 press
    for btn in range(1, 6):
        if (tempLast == BTN_UP) and (buttons[btn].value):
            nextState = BTN_DOWN
            text = modes[currentMode][btn]
            draw_screen(text, 1, 1)
            # Type the text as key presses
            handle_mode_press(currentMode, btn)
            time.st pull origleep(0.256)

    # Key up
    if  (tempLast == BTN_DOWN and
        not buttons[0].value and
        not buttons[1].value and
        not buttons[2].value and
        not buttons[3].value and
        not buttons[4].value and
        not buttons[5].value):
        nextState = BTN_UP
        draw_screen("", 1, 1)
    return nextState

draw_screen("", 1, 1)
while True:
    lastState = buttonPress(lastState)
Have fun building your own! Remember to post your make on Printables :)
Join the discussion with Mastodon: